Designing a microservice-oriented application can result in making tens or hundreds of small loosely coupled services that interact with each other via a lightweight protocol. Many business transactions are made up of small transactions that get executed inside multiple microservices. In order to complete the transaction, microservices need to execute their own (local) transactions and pass the result or status of their own work to other involved microservices. If one microservice fails to do its part, the work of all involved microservices has to get discarded and rolled back.
Communication plays an important role in a microservices architecture. Microservices need to communicate with each other using a fast, lightweight, and reliable protocol to get the job done. A single message loss in the application may result in cascading failures that lead to great losses.
In this post, we are going to see how we can design and implement a reliable messaging system in a microservices architecture based on the Transactional Outbox pattern and using Apache Kafka, Debezium, Micronaut framework, and Oracle Database.
Introduction
The communication in a microservices architecture can happen in two ways:
- Synchronous Communication. Like using the HTTP protocol, one microservice sends a request to another microservice and will wait (blocks) for the response before continuing. This type of communication can be suitable for many use cases. But the blocking nature of an HTTP communication can hurt performance in scenarios that low latency is required or we don’t want the answer right away.
- Asynchronous Communication. Like using a message broker (Kafka, RabbitMQ, …), one microservice publishes a message to a queue/topic, and another microservice that has subscribed to the same queue/topic receives the message and starts processing it. Using a message broker can provide many benefits like loose coupling between microservices, better scalability, and higher performance because of the non-blocking nature of event-driven architectures.
So using a message broker for async communication seems like a perfect solution for many use cases in a microservices architecture. But how can we implement a reliable message exchange between our microservices? What delivery semantics should we use?
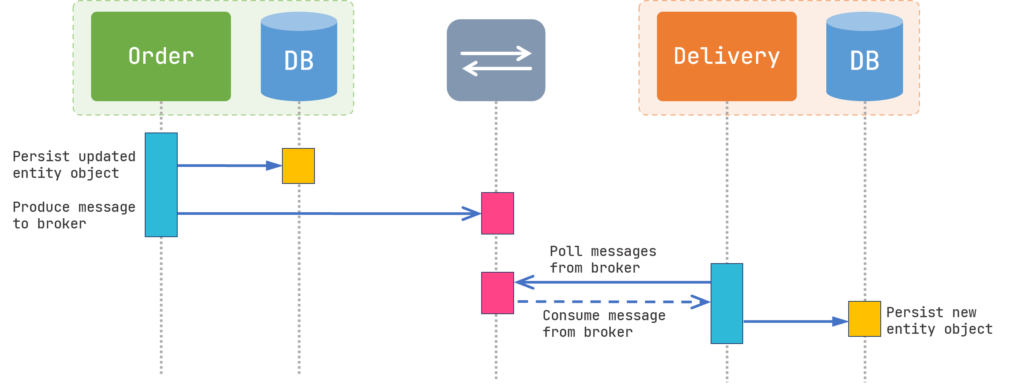
Assume we have two microservices: Order for managing user orders and Delivery for managing the delivery of the ordered products. A user has completed the payment and chose a delivery method. Order receives an HTTP request containing the latest status of the user’s order along with the chosen delivery method.
Figure 1 shows an approach where the Order talks directly to the message broker. In this scenario, after receiving the HTTP request from the user, Order updates the database and sends a message to Delivery through the broker. Delivery receives the message from the broker and updates the database.
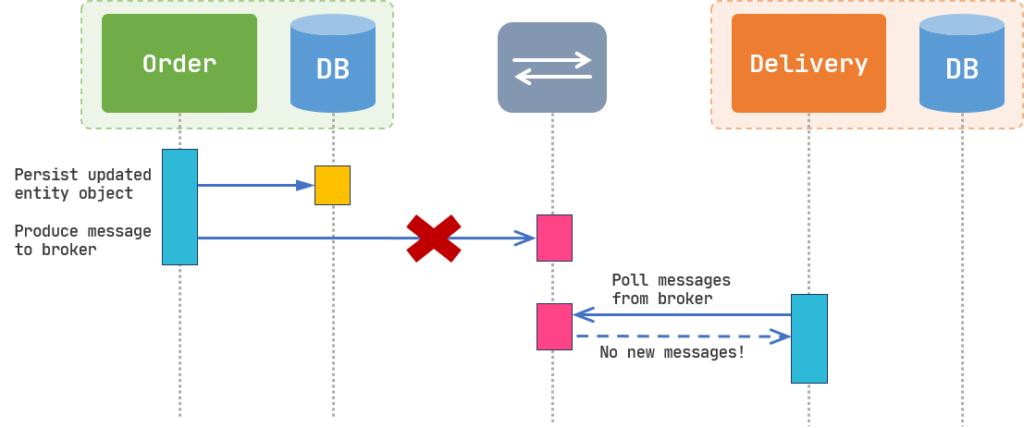
Everything looks great so far and our application is functioning properly in the production environment for months. But one day, you receive some customer complaints about products that have not been delivered on time! After some investigation, you find out that some of the completed orders don’t have any records inside the Delivery database and no delivery method has been submitted for those orders. But how did this happen? Why the Order didn’t produce the message to the broker and how the message got lost?
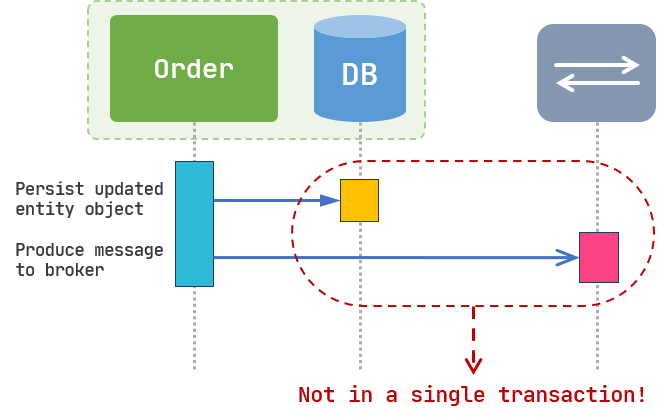
The reason is that both “Updating the database” and “Publishing a message to the broker” are not inside a single transaction and they are two completely separate units of work. As shown in Figure 2, if for any reason Order can’t produce the message to the broker, we might not be able to roll back the database transaction.
You might try to mitigate the problem by adding some callbacks for the producer. By doing so, the Order microservice can receive an event with failed status when it fails to send the message, and then you can add some logic to do a manual rollback (like changing the order status to failed). But what if the Order microservice crashes right after persisting the updated entity and right before producing the message to the broker? Every solution like this will add overhead and complexity to the code. Therefore, we need a better solution to put both works into a single transaction and make it a single unit of work. (If you are thinking about the Two-Phase Commit solution, it’s not appropriate to use it in a microservices architecture. read this blog post by Daniel Abadi for a thorough explanation)
The Outbox Pattern
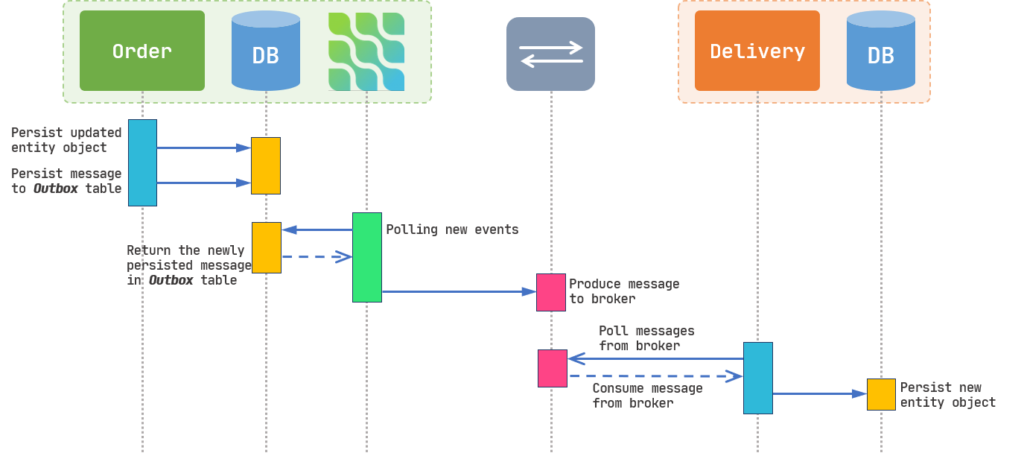
Our service needs to update the database and send a message to another microservice in a single transaction and messages must deliver in the same order they were sent. Instead of directly publishing our message to the message broker, we instead persist that message with some metadata to a table named Outbox.
We also need another service to act as a middle-man between the database and the broker. It consumes messages inside the Outbox table with at-least-once or exactly-once delivery semantics and publishes them to the message broker. We are going to use Debezium for this purpose.
Debezium is an open source distributed platform for change data capture. Start it up, point it at your databases, and your apps can start responding to all of the inserts, updates, and deletes that other apps commit to your databases. Debezium is durable and fast, so your apps can respond quickly and never miss an event, even when things go wrong.
Debezium
As you can see in Figure 4, now we persist our message to the database instead of producing to the message broker. Therefore, “persisting the updated entity” and “producing the message to the broker” are now inside a single transaction.
Now, let’s get into some exciting code and YAML configurations!
Implementing the Outbox Pattern
For this blog post, we’re going to use Apache Kafka as our message broker and write our sample microservices in Java using the Micronaut framework. Our microservices are going to use the Oracle database. And of course, we’re going to use Debezium for capturing database changes and events. And we will deploy all of these on Minikube.
First of all, we’re going to set up Apache Kafka using Strimzi and afterward, we will deploy Debezium via Kafka Connect.
Deploying Apache Kafka using Strimzi
I’m not going through the steps to deploy Strimzi on Kubernetes since we have explained it before in another blog post. Check it out from this link (Make sure to get the latest version of Strimzi from their website. I have used an older version in this blog post. The installation steps are the same but just use the new apiVersion, which is “kafka.strimzi.io/v1beta2”. I will update my post to the latest version of Strimzi in near future).
Let’s assume you have deployed the Strimzi Operator on a namespace named “kafka”. Now, we’re going to deploy Kafka with ephemeral storage for the sake of simplicity using this YAML:
apiVersion: kafka.strimzi.io/v1beta2
kind: Kafka
metadata:
  name: my-cluster
spec:
  kafka:
    version: 2.8.0
    replicas: 1
    listeners:
      - name: plain
        port: 9092
        type: internal
        tls: false
      - name: external
        port: 9094
        type: nodeport
        tls: false
    config:
      auto.create.topics.enable: "true"
      offsets.topic.replication.factor: 1
      transaction.state.log.replication.factor: 1
      transaction.state.log.min.isr: 1
      log.message.format.version: "2.8"
      inter.broker.protocol.version: "2.8"
    storage:
      type: ephemeral
  zookeeper:
    replicas: 1
    storage:
      type: ephemeral
  entityOperator:
    topicOperator: {}
    userOperator: {}
After preparing the deployment YAML file, deploy it using the kubectl apply command:
$ kubectl apply -f kafka-ephemeral.yaml -n kafka
Now, let’s see if our Kafka cluster is up and running:
$ kubectl get Kafka -n kafka

NAME         DESIRED KAFKA REPLICAS   DESIRED ZK REPLICAS   READY   WARNINGS
my-cluster   1                        1                     True    True
Since we have enabled the auto-creation of topics inside our deployment file, we don’t need to apply KafkaTopic deployments to create topics. But don’t do this in the production environment and always investigate what topics you need and create them yourself! 🙂
Now, let’s deploy a Kafka Connect cluster on our Kafka cluster!
Deploying Kafka Connect
Kafka Connect is a framework used for connecting Kafka with external systems and stream data into and out of the Kafka cluster reliably with the help of connector plugins. There are many ready-to-use Kafka Connectors available on the internet to connect with various systems like most of the databases, various message brokers (JMS, RabbitMQ, …), HTTP and FTP protocols, etc. By using these connectors, your microservices can only connect and work with Kafka instead of including hefty libraries and drivers, and use Connectors for integrating with external systems. Kafka Connect framework is also scalable and fault-tolerant. Kafka Connect uses REST API to create and configure connectors inside the Connect cluster.
Kafka Connect uses two types of connectors:
- Source connector. A source connector ingests data from external systems to Kafka topics.
- Sink connector. A sink connector consumes data from Kafka topics and produces them to external systems.
For more information about Kafka Connect concepts, visit Confluent’s documentation about Kafka Connect.
Strimzi has really good “Kubernetes-native” support for Kafka Connect. With their new “KafkaConnector” resource, there’s no need to use REST API for creating connectors and instead, YAML deployments can be used. Now, let’s configure and deploy our Connect cluster. At first, we have to deploy the “KafkaConnect” resource to Kubernetes. In this deployment, we specify general properties, connector plugins, and their dependencies (if needed). We are using the minimum required properties only for the sake of simplicity. For other features and properties of the KafkaConnect resource, please visit Strimzi documentation.
apiVersion: kafka.strimzi.io/v1beta2
kind: KafkaConnect
metadata:
  name: my-dbz-connect-cluster
  annotations:
    strimzi.io/use-connector-resources: "true" #1
spec:
  version: 2.8.0 #2
  replicas: 1 #3
  bootstrapServers: my-cluster-kafka-bootstrap:9092 #4
  config: #5
    group.id: dbz-connect-cluster
    offset.storage.topic: dbz-connect-cluster-offsets
    config.storage.topic: dbz-connect-cluster-configs
    status.storage.topic: dbz-connect-cluster-status
    config.storage.replication.factor: 1
    offset.storage.replication.factor: 1
    status.storage.replication.factor: 1
  build: #6
    output: #7
      type: docker
      image: docker.io/username/strimzi-dbz-oracle-connector:1.7.0.CR2
      pushSecret: dockercred #8
    plugins: #9
      - name: debezium-oracle-connector
        artifacts:
          - type: tgz
            url: https://repo1.maven.org/maven2/io/debezium/debezium-connector-oracle/1.7.0.CR2/debezium-connector-oracle-1.7.0.CR2-plugin.tar.gz
            sha512sum: 608F919B955EEA292F2FE9284DF678F55D21CC9735875227F8D29138C39DD272C4274E8557D2CFABAEAEED6291ADC4D63833CD1989B116ACB5222EBE59E50B73
          - type: jar
            url: https://repo1.maven.org/maven2/com/oracle/database/jdbc/ojdbc11/21.3.0.0/ojdbc11-21.3.0.0.jar
sha512sum: B1F665D5203090A92AF98BD674ABB69C0BADD9114244421E57160969307C0F9350C28ED7B951DBA7EA310E9F733701F21DBA1E4CE6ABD721F09C15B4EE5B7798- by setting this property to “true”, we can use KafkaConnector resources for creating and configuring connectors instead of using REST API.
- The Kafka Connect version to use.
- Specifies the number of pods (replicas) for Kafka Connect cluster.
- The address of the Kafka cluster. “9092” is the port that we have specified as the internal port in Kafka resource (previous deployment). To find out what address to use, read “Testing our Kafka Cluster” section of my previous blog post
- Strimzi sets default values for “config” properties. But if you plan to run multiple instances of Kafka Connect, you have to override the default values so that the values don’t conflict with other Connect instances. These configs include the group id that this instance belongs to and Kafka topics to store connector offsets, task status configurations, and updates and their replication factor.
- Strimzi can build the connector image with specified plugins and push it to the desired container registry. The properties needed for building an image and publishing it resides in output and plugins section.
- Strimzi supports public registries like Quay and Docker Hub and also private registries. In this deployment, since we are pushing our image to Docker Hub, we have to specify the type as “docker”, and for the “image”, we have to put a full URL which contains the address of the registry, its port number, and a tag. Each Kafka Connect deployment must use a separate image with a unique tag.
- For pushing our image to docker, we need to set the credentials for our account using a Secret. For our example, we are creating a Secret named “dockercred” inside the kafka namespace that contains our credentials via the following command:
$ kubectl create secret docker-registry dockercred --docker-server=https://index.docker.io/v1/ --docker-username=username --docker-password=password --docker-email=your.email@gmail.com -n kafka
- For this part, we are going to specify the connect plugins and dependencies that we need.
Strimzi supports jar, which is downloaded and used directly, tgz, which will be unpacked after downloading, and other, which will be used directly after downloading.
Our database is going to be Oracle. So we have to use the Debezium Oracle Connector Plugin. Get the link to the latest version from the Debezium release page. The latest version is 1.7.0.CR2 at the time of writing this post. This file is in tgz format so Strimzi is going to unpack it and put the jar files of the package directly in the classpath. Also, we need to include the Oracle JDBC driver. You can find the link to the latest version from here (check if Debezium is compatible with the JDBC driver version from their website).
You can also specify the sha512 checksum of the file so that Strimzi can verify the downloaded package after downloading. There are plenty of ways to calculate the file’s sha512 checksum. If you are using Windows, you can use Powershell to calculate it via the following command.
PS > Get-FileHash ojdbc11-21.3.0.0.jar -Algorithm SHA512 | Format-List

Algorithm : SHA512
Hash      : B1F665D5203090A92AF98BD674ABB69C0BADD9114244421E57160969307C0F9350C28ED7B951DBA7EA310E9F733701F21DBA1E4CE6ABD721F09C15B4EE5B7798
Path      : C:\Users\Sina\...\ojdbc11-21.3.0.0.jar
Let’s apply our KafkaConnect resource. Keep in mind that getting the Kafka Connect cluster up and running might take some time depending on your internet connection.
$ kubectl apply -f kafka-connect.yaml -n kafka
After applying the resource, it’s going to create a pod whose job is to build and push the image. Let’s find that pod, wait until its state is “Running” and check its logs.
$ kubectl get pods -n kafka

NAME                                          READY   STATUS    RESTARTS   AGE
...
my-dbz-connect-cluster-connect-build          1/1     Running   0          43s
...

$ kubectl logs -f my-dbz-connect-cluster-connect-build -n kafka

←[36mINFO←[0m[0003] Retrieving image manifest quay.io/strimzi/kafka:0.25.0-kafka-2.8.0
←[36mINFO←[0m[0003] Retrieving image quay.io/strimzi/kafka:0.25.0-kafka-2.8.0 from registry quay.io
...
←[36mINFO←[0m[0145] Pushing image to docker.io/nrsina/strimzi-dbz-oracle-connector:1.7.0-20210831.000246-215
←[36mINFO←[0m[0241] Pushed image to 1 destinations
After the build task is complete. the my-dbz-connect-cluster-connect-build pod will be removed and our Kafka Connect pod will be created.
$ kubectl get KafkaConnect -n kafka

NAME                     DESIRED REPLICAS   READY
my-dbz-connect-cluster   1                  True

$ kubectl get pods -n kafka

my-dbz-connect-cluster-connect-65d4679db7-9gmbr   1/1    Running    0    3m48s
Check your Docker Hub account to see if the image has been uploaded successfully.
Now, we can apply our Debezium Connector tasks with the KafkaConnector resource. But before that, let’s set up and configure our Oracle database.
Deploying and Configuring the Oracle Database
The Oracle database images are not available inside the Docker Hub and Oracle has its own container registry. One way to get the image on Minikube is to get inside the Minikube VM with SSH and get the image directly via the Docker CLI.
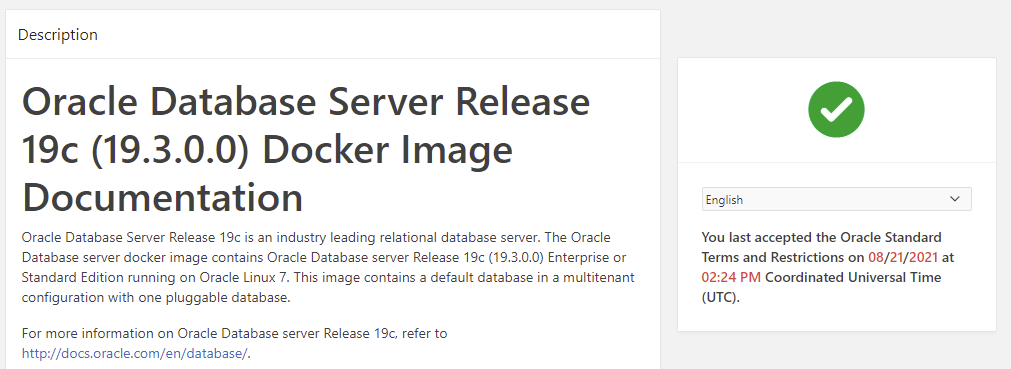
But before doing that, go to the Oracle Container Registry website, sign in or create a new account, go to the Database Repositories section and find the Oracle Database Enterprise Edition. As in Figure 5, You have to accept the Oracle Standard Terms and Restrictions before pulling the image.
Now, get inside the Minikube VM with SSH and use docker login command to log in to the Oracle Container Registry. It then asks you to enter the Username (email address) and Password of your Oracle account.
$ minikube ssh
$ docker login container-registry.oracle.com
Now, you can pull the image inside your Minikube VM easily with the below command:
$ docker pull container-registry.oracle.com/database/enterprise:latest
Wait until Docker downloads the Oracle images. It might take a while depending on your internet connection since the image is large. After it completes, exit the VM by typing “exit“. Now, let’s create a namespace for our Oracle database on Kubernetes.
$ kubectl create ns oracle
In the below resource file, we’re creating a deployment and two services (ClusterIP and NodePort) for our database in the oracle namespace. As I said before, we’re skipping persistent volume creation and attachment to pods for the sake of simplicity. So if you remove the pod, you’ll lose your data.
apiVersion: apps/v1
kind: Deployment
metadata:
  name: odb19c-deployment
  namespace: oracle
  labels:
    app: oracle19c
spec:
  replicas: 1
  selector:
    matchLabels:
      app: oracle19c
  template:
    metadata:
      labels:
        app: oracle19c
    spec:
      containers:
      - name: odb19c
        image: container-registry.oracle.com/database/enterprise:latest
        imagePullPolicy: IfNotPresent
        ports:
        - name: sqlnet
          containerPort: 1521
          protocol: TCP
        env:
        - name: ORACLE_SID
          value: "ORCLCDB"
        - name: ORACLE_PDB
          value: "ORCLPDB1"
        - name: ORACLE_PWD
          value: "top_secret"
---
apiVersion: v1
kind: Service
metadata:
  name: odb19c-cip-svc
  namespace: oracle
spec:
  type: ClusterIP
  selector:
    app: oracle19c
  ports:
    - name: sqlnet
      port: 1521
      targetPort: 1521
      protocol: TCP
---
apiVersion: v1
kind: Service
metadata:
  name: odb19c-np-svc
  namespace: oracle
spec:
  type: NodePort
  selector:
    app: oracle19c
  ports:
    - name: sqlnet
      port: 1521
      targetPort: 1521
      nodePort: 31521
      protocol: TCP
Apply the above resource file and check the logs to see when the database will be ready.
$ kubectl get pods -n oracle

NAME                                READY   STATUS    RESTARTS   AGE
odb19c-deployment-988b478f7-f7xmg   1/1     Running   0          9s

$ kubectl logs -f odb19c-deployment-988b478f7-f7xmg -n oracle

ORACLE EDITION: ENTERPRISE
ORACLE PASSWORD FOR SYS, SYSTEM AND PDBADMIN: top_secret
LSNRCTL for Linux: Version 19.0.0.0.0 - Production on 25-SEP-2021 16:26:15
Copyright (c) 1991, 2019, Oracle.  All rights reserved.
Starting /opt/oracle/product/19c/dbhome_1/bin/tnslsnr: please wait...
...
Prepare for db operation
8% complete
Copying database files
31% complete
Creating and starting Oracle instance
...
100% complete
Database creation complete. For details check the logfiles at:
 /opt/oracle/cfgtoollogs/dbca/ORCLCDB.
Database Information:
Global Database Name:ORCLCDB
System Identifier(SID):ORCLCDB

...
#########################
DATABASE IS READY TO USE!
#########################

...
XDB initialized.
As it’s written in the logs, our database is ready to use! To connect our Oracle database to Debezium successfully, we need to enable and configure LogMiner. So let’s get to work!
Configuring LogMiner in Oracle Database
Debezium can connect to the Oracle database in two methods: XStreams and LogMiner. The former needs a GoldenGate license in order to work, but the latter is completely free to use. By using the LogMiner, the user can query the archived and online redo logs through a SQL interface. Debezium makes use of the LogMiner to read the history of the tables and also the events that happened in the past. But before configuring the LogMiner, you have to put our database into the ARCHIVELOG mode.
The Oracle database can run in one of these two modes:
- NOARCHIVELOG. In this mode, which is the default mode, the archiving of the redo logs is disabled and it’s not possible to do online backups or point-in-time recovery of the database. So in order to take a backup of the database, you have to shut it down and take the backup. And if you want to restore the database to a previous point in time, it’s only possible to restore it to the point when you have taken the backup.
- ARCHIVELOG. In this mode, the database copies its redo log files in a specific place after they’re filled completely while the database is running. These copies are called “Archived Redo Logs”. By using this mode, you can do online backups and point-in-time recovery. Eventually, the database saves its archived redo logs in a place called “Flash Recovery Area”.
Debezium needs to read the redo logs when the database is running so the database must be in the ARCHIVELOG. Now, let’s put our database in this mode and configure the LogMiner.
Note: We are going to deploy our database in container mode (CDB) and configure Debezium according to this deployment type. If you want to deploy your database in non-container mode (non-CDB), the configuration is almost the same. Visit Debezium‘s documentation for more information.
First of all, let’s get into the pod’s bash shell and run some commands.
$ kubectl exec -it odb19c-deployment-988b478f7-f7xmg bash -n oracle
From now on, you should run the below commands in the bash shell of your database pod. First of all, create a directory for the recovery area of your database:
$ cd /opt/oracle/oradata/
$ mkdir -p recovery_area
While you’re inside the pod, use SQL*Plus query tool to change the database mode to ARCHIVELOG:
$ sqlplus /nolog

SQL> CONNECT sys/top_secret AS SYSDBA
Connected.
SQL> alter system set db_recovery_file_dest_size = 10G;
System altered.
SQL> alter system set db_recovery_file_dest = '/opt/oracle/oradata/recovery_area' scope=spfile;
System altered.
SQL> shutdown immediate
Database closed.
Database dismounted.
ORACLE instance shut down.
SQL> startup mount
Database mounted.
SQL> alter database archivelog;
Database altered.
SQL> alter database open;
Database altered.
After running the above commands, check if the database is in the ARCHIVELOG mode with the below command. It should show that the database log mode is now “Archive Mode”.
SQL> archive log list;

Database log mode              Archive Mode
Automatic archival             Enabled
Archive destination            USE_DB_RECOVERY_FILE_DEST
Oldest online log sequence     5
Next log sequence to archive   7
Current log sequence           7
We can also run the remaining commands from outside of the pod. We have also created a NodePort service for our database. So we can easily access it from outside (but you have to download the SQL*PLUS client from Oracle’s website). Get the Minikube IP address with “minikube ip” command.
From now on, I’m going to use a SQL*PLUS windows client and connect to the database via the NodePort service which we have created earlier. But if you don’t want to do this, you can run the commands inside the pod’s bash shell as well like we did above.
We have to enable minimal supplemental logging in our database in order for LogMiner to capture the DML changes so that Debezium can use it to provide the “before state” of the changed database rows. Let’s connect to the root container (CDB) as SYSDBA and enable it:
$ sqlplus sys/top_secret@//192.168.99.108:31521/ORCLCDB AS SYSDBA

SQL> ALTER DATABASE ADD SUPPLEMENTAL LOG DATA;

Database altered.
Now, it’s time to create a user with some specific permissions in the database that has access to the LogMiner for our Debezium connector. Connect to the root container (CDB) and create a tablespace for the LogMiner user:
$ sqlplus sys/top_secret@//192.168.99.108:31521/ORCLCDB AS SYSDBA

SQL> CREATE TABLESPACE LOGMINER_TBS DATAFILE '/opt/oracle/oradata/ORCLCDB/logminer_tbs.dbf'  SIZE 25M REUSE AUTOEXTEND ON MAXSIZE UNLIMITED;

Tablespace created.

SQL> exit;
Now, connect to the PDB container (ORCLPDB1) as SYSDBA and create a tablespace:
$ sqlplus sys/top_secret@//192.168.99.108:31521/ORCLPDB1 AS SYSDBA

SQL> CREATE TABLESPACE LOGMINER_TBS DATAFILE '/opt/oracle/oradata/ORCLCDB/ORCLPDB1/logminer_tbs.dbf' SIZE 25M REUSE AUTOEXTEND ON MAXSIZE UNLIMITED;

Tablespace created.

SQL> exit;
Note: If you want to see which container you are connected to, find out with the below command:
SQL> show con_name;

CON_NAME
------------------------------
ORCLPDB1
After creating the tablespace, create a CDB user and grant the below permissions to the user (CDB users should start with “c##”)
$ sqlplus sys/top_secret@//192.168.99.108:31521/ORCLCDB as sysdba

SQL> CREATE USER c##dbzuser IDENTIFIED BY dbz DEFAULT TABLESPACE logminer_tbs QUOTA UNLIMITED ON logminer_tbs CONTAINER=ALL;

SQL> GRANT CREATE SESSION TO c##dbzuser CONTAINER=ALL;
SQL> GRANT SET CONTAINER TO c##dbzuser CONTAINER=ALL;
SQL> GRANT SELECT ON V_$DATABASE to c##dbzuser CONTAINER=ALL;
SQL> GRANT FLASHBACK ANY TABLE TO c##dbzuser CONTAINER=ALL;
SQL> GRANT SELECT ANY TABLE TO c##dbzuser CONTAINER=ALL;
SQL> GRANT SELECT_CATALOG_ROLE TO c##dbzuser CONTAINER=ALL;
SQL> GRANT EXECUTE_CATALOG_ROLE TO c##dbzuser CONTAINER=ALL;
SQL> GRANT SELECT ANY TRANSACTION TO c##dbzuser CONTAINER=ALL;
SQL> GRANT LOGMINING TO c##dbzuser CONTAINER=ALL;
SQL> GRANT CREATE TABLE TO c##dbzuser CONTAINER=ALL;
SQL> GRANT LOCK ANY TABLE TO c##dbzuser CONTAINER=ALL;
SQL> GRANT CREATE SEQUENCE TO c##dbzuser CONTAINER=ALL;
SQL> GRANT EXECUTE ON DBMS_LOGMNR TO c##dbzuser CONTAINER=ALL;
SQL> GRANT EXECUTE ON DBMS_LOGMNR_D TO c##dbzuser CONTAINER=ALL;
SQL> GRANT SELECT ON V_$LOG TO c##dbzuser CONTAINER=ALL;
SQL> GRANT SELECT ON V_$LOG_HISTORY TO c##dbzuser CONTAINER=ALL;
SQL> GRANT SELECT ON V_$LOGMNR_LOGS TO c##dbzuser CONTAINER=ALL;
SQL> GRANT SELECT ON V_$LOGMNR_CONTENTS TO c##dbzuser CONTAINER=ALL;
SQL> GRANT SELECT ON V_$LOGMNR_PARAMETERS TO c##dbzuser CONTAINER=ALL;
SQL> GRANT SELECT ON V_$LOGFILE TO c##dbzuser CONTAINER=ALL;
SQL> GRANT SELECT ON V_$ARCHIVED_LOG TO c##dbzuser CONTAINER=ALL;
SQL> GRANT SELECT ON V_$ARCHIVE_DEST_STATUS TO c##dbzuser CONTAINER=ALL;

SQL> exit;
The only thing that still remains is the creation of the Outbox table and enabling supplemental logging for it (I actually used Hibernate to create the tables. You can run the applications later and let the Hibernate create the tables for you, and enable the supplemental logging afterward). We’ll need some specific columns for our Outbox table in order to use the Outbox Event Router feature of the Debezium.
$ sqlplus c##dbzuser/dbz@//192.168.99.108:31521/ORCLPDB1

SQL> create table outbox (id raw(255) not null, aggregate_id varchar2(255 char) not null, aggregate_type varchar2(255 char) not null, payload BLOB NOT NULL, timestamp timestamp, type varchar2(255 char) not null, primary key (id));

Table created.

SQL> describe outbox;

 Name                                      Null?    Type
 ----------------------------------------- -------- ----------------------------
 ID                                        NOT NULL RAW(255)
 AGGREGATE_ID                              NOT NULL VARCHAR2(255 CHAR)
 AGGREGATE_TYPE                            NOT NULL VARCHAR2(255 CHAR)
 PAYLOAD                                   NOT NULL BLOB
 TIMESTAMP                                          TIMESTAMP(6)
 TYPE                                      NOT NULL VARCHAR2(255 CHAR)
SQL> ALTER TABLE outbox ADD SUPPLEMENTAL LOG DATA (ALL) COLUMNS;

Table altered.
You have to enable the supplemental logging for any table that you want Debezium to capture its changes. Our business tables will be created by the applications so I’m going to skip this part.
Phew! Our database configuration is done. Let’s fire up our Debezium connector before getting into the microservices.
Deploying the Debezium Kafka Connector
We have set up our Connect cluster and configured our database. Now it’s time to configure and deploy our Kafka Connector. The Debezium connector has various properties and many features. Getting into all of it takes a lot of time and this blog post has got too long already. The Debezium documentation is really well written so I highly recommend reading it completely.
Let’s create the KafkaConnector resource file. We need to use the OracleConnector class in our configuration and put properties related to this connector class inside our YAML file. Besides that, we need to use the Outbox Event Router which is a connector SMT (Single Message Transforms) provided by the Debezium.
apiVersion: kafka.strimzi.io/v1beta2
kind: KafkaConnector
metadata:
  name: dbz-oracle-outbox-connector
  labels:
    strimzi.io/cluster: my-dbz-connect-cluster
spec:
  class: io.debezium.connector.oracle.OracleConnector #1
  tasksMax: 1
  config:
    database.hostname: odb19c-cip-svc.oracle.svc.cluster.local #2
    database.port: 1521
    database.user: C##DBZUSER
    database.password: dbz
    database.dbname: ORCLCDB
    database.pdb.name: ORCLPDB1
    database.server.name: server1
    database.connection.adapter: logminer
    schema.include.list: C##DBZUSER #3
    table.include.list: C##DBZUSER.OUTBOX #4
    tombstones.on.delete: false
    lob.enabled: true #5
    transforms: outbox
    transforms.outbox.type: io.debezium.transforms.outbox.EventRouter #6
    transforms.outbox.table.fields.additional.placement: TYPE:header:eventType #7
    transforms.outbox.table.field.event.id: ID #8
    transforms.outbox.table.field.event.key: AGGREGATE_ID
    transforms.outbox.table.field.event.payload: PAYLOAD
    transforms.outbox.table.field.event.timestamp: TIMESTAMP
    transforms.outbox.table.field.event.payload.id: AGGREGATE_ID
    transforms.outbox.route.by.field: AGGREGATE_TYPE #9
    value.converter: io.debezium.converters.ByteBufferConverter
    value.converter.schemas.enable: false #10
    value.converter.delegate.converter.type: org.apache.kafka.connect.json.JsonConverter
    value.converter.delegate.converter.type.schemas.enable: false
    database.history.kafka.bootstrap.servers: my-cluster-kafka-bootstrap:9092
    database.history.kafka.topic: schema-changes.outbox
    poll.interval.ms: 100
Let’s get into some of the properties that I think need some more explanation. For the rest of them, please visit the Oracle Connector and Outbox Event Router sections of the Debezium Documentation.
- We want to use the Oracle Connector so we need to specify the OracleConnector class for this property.
- We are specifying the database address, CDB/PDB names, and the LogMiner user information that we created earlier in the properties that start with “database.”. odb19c-cip-svc is the service name of our Oracle database.
- We are limiting the Debezium to this schema only. Since the schema name is the same as the username in Oracle, we are using the LogMiner username here.
- We only want this connector to capture the events of the Outbox table.
- Since we have declared the PAYLOAD column as BLOB in our Outbox table, we have to enable LOB support.
- We want to use the Outbox SMT feature of the Debezium. It converts the captured event into a format that is appropriate for our use case.
- We want to put the TYPE column value of the Outbox table inside the Kafka message header with “eventKey” as the key.
- We are specifying each column name of our Outbox table in properties that start with “transforms.outbox.table.field.event.”. This is needed for the Oracle database because Oracle capitalizes the column names and it’s different from the default values.
- the route.by.field property value becomes part of the topic name that Debezium publishes the events to. Here, we are using the AGGREGATE_TYPE column as the value. for example, an event with an aggregate type of “order” will be routed to “outbox.event.order” topic and an event with “delivery” as the aggregate type will be routed to “outbox.event.delivery” topic.
There’s also another property called “route.topic.replacement” and the default value is “outbox.event.${routedByValue}”. You can change it if you want a different topic name style. - We don’t need information about the Schema inside our Kafka message’s body so we are disabling it.
Now, let’s deploy our KafkaConnector resource (You should deploy the Connect cluster before this part)
$ kubectl apply -f source-connector.yaml -n kafka
And check the Connect cluster logs to see if everything is working as expected.
$ kubectl logs -f my-dbz-connect-cluster-connect-65d4679db7-9gmbr -n kafka
If you want to check your connector resource, use the below command:
$ kubectl get KafkaConnector -n kafka
Our connector is now waiting for changes to happen inside our Outbox table to capture and convert them to a friendly format using the Outbox SMT and send it to Kafka!
Creating and Deploying Microservices
We are going to create two microservices, Order and Delivery, using the Micronaut Framework. Micronaut is a JVM-based framework for building modular, easily testable JVM applications with support for Java, Kotlin, and Groovy. The thing that I really love about Micronaut is that it always tries to do all the hard work at compile time using Annotation Processing instead of runtime and avoids using reflection and runtime bytecode generation. This results in faster startup times, lower memory footprint, easy unit testing, and small stack traces which results in easier debugging. The coding style is very similar to Spring Framework. If you have worked with Spring, you should have no problem understanding the code. In case you are using Quarkus Framework for developing your application, Debezium has a library for easily using the Outbox Event Router and it’s called Outbox Quarkus Extension.
I’m just going to show some parts of the code here, please visit the full source code on Github.
First of all, I’m going to use Hibernate for interacting with the Oracle database. The Order microservice wants to send a message to the Delivery microservice as we explained earlier. Therefore, instead of directly producing the message to Kafka, we have to persist our message inside the Outbox table.
Here’s our Outbox entity from the Order microservice. Using @Immutable is a good small optimization since the rows inside this table will never get modified and we’re only inserting and deleting rows. So Hibernate’s Dirty Tracking feature will ignore this Entity entirely.
@Entity
@Immutable
public class Outbox {

    @Id
    private UUID id;

    @Column(nullable = false)
    private String aggregateType;

    @Column(nullable = false)
    private String aggregateId;

    @Column(nullable = false)
    private String type;

    @Lob
    @Column(columnDefinition = "BLOB NOT NULL")
    private byte[] payload;

    @DateCreated
    @Column(updatable = false)
    private Instant timestamp;

    ...
}
And the EventDispatcher class which persists messages inside the Outbox table:
@Singleton
public class EventDispatcher {

    private final OutboxRepository outboxRepository;
    private final CBORMapper mapper = new CBORMapper();

    private final Logger logger = LoggerFactory.getLogger(EventDispatcher.class);

    public EventDispatcher(OutboxRepository outboxRepository) {
        this.outboxRepository = outboxRepository;
    }

    @Transactional(Transactional.TxType.MANDATORY)
    public <T> void dispatch(OutboxEvent<T> event) throws JsonProcessingException {
        Outbox outbox = new Outbox();
        outbox.setId(UUID.randomUUID());
        outbox.setAggregateType(event.getAggregateType());
        outbox.setAggregateId(event.getAggregateId());
        outbox.setType(event.getType());
        outbox.setPayload(mapper.writeValueAsBytes(event.getPayload()));
        outboxRepository.save(outbox);
        logger.info("Persisted event [{}, {}] inside the Outbox table", event.getAggregateType(), event.getAggregateId());
    }
}
We are using Jackson to serialize our message in CBOR data format. As you may have noticed. the transaction type is set to MANDATORY because persisting message inside the Outbox table should be in the same transaction as our business logic. Therefore, in case of any failure, they both can get rolled back.
The good thing about using Debezium for Outbox pattern is that we can remove the inserted rows after the insert transaction is committed successfully and ignore the “DELETE” transactions in Debezium. I think the Outbox SMT will ignore them itself but I haven’t tested it yet. This way, our Outbox table will never grow.
We’re calling the EventDispatcher.dispatch() method in our OrderService.createOrder() method:
    private final OrderRepository orderRepository;
    private final EventDispatcher eventDispatcher;

    public OrderService(OrderRepository orderRepository, EventDispatcher eventDispatcher) {
        this.orderRepository = orderRepository;
        this.eventDispatcher = eventDispatcher;
    }

    @Transactional
    public Order createOrder(Order newOrder) throws JsonProcessingException {
        final Order savedOrder = orderRepository.save(newOrder);
        eventDispatcher.dispatch(new OutboxEvent<DeliveryEvent>()
                .setAggregateType(Order.class.getSimpleName().toLowerCase())
                .setAggregateId(String.valueOf(savedOrder.getId()))
                .setType("OrderPlaced")
                .setPayload(new DeliveryEvent(savedOrder.getId(), savedOrder.getCustomerId())));
        return savedOrder;
    }
And also there’s a POST method inside the OrderController class that we use to send an Order Placement request to our Order microservice.
In our Delivery microservice, we need a Kafka Consumer to consume the messages that are being received from the Order microservice using the Outbox Pattern:
@KafkaListener(groupId = "delivery_group",
        threads = 1,
        offsetStrategy = OffsetStrategy.SYNC,
        properties = {
                @Property(name = ConsumerConfig.VALUE_DESERIALIZER_CLASS_CONFIG, value = "com.snourian.outbox.delivery.messaging.serdes.DeliveryEventDeserializer"),
                @Property(name = ConsumerConfig.KEY_DESERIALIZER_CLASS_CONFIG, value = "org.apache.kafka.common.serialization.StringDeserializer")
        })
public class DeliveryEventConsumer {

    private final DeliveryService deliveryService;
    private final Logger logger = LoggerFactory.getLogger(DeliveryEventConsumer.class);

    public DeliveryEventConsumer(DeliveryService deliveryService) {
        this.deliveryService = deliveryService;
    }

    @Topic(patterns = "outbox.event.order")
    public void receive(@KafkaKey String key,
                        @MessageHeader("id") String aggregateId,
                        @MessageHeader("eventType") String eventType,
                        @MessageBody DeliveryEvent deliveryEvent) {
        logger.info("Received a Kafka event | Key: {}, aggregateId: {}, EventType: {}", key, aggregateId, eventType);
        deliveryService.createDelivery(new Delivery(deliveryEvent.getOrderId(), deliveryEvent.getCustomerId()));
    }
}
Finally, we are using the Gradle JIB plugin to create images for our microservices and push them to Docker Hub. Now, let’s deploy our microservices in Kubernetes. We only need to create a NodePort service for the Order microservice so we can easily send an HTTP POST request to it. The YAML files are available in the Github repository.
After sending the POST request, the Order microservice persists the data inside the TB_ORDER table and, in the same transaction, persists the message that needs to be sent to the Delivery microservice inside the OUTBOX table. The Debezium connector receives an event for the Outbox table, converts it to a friendly format via the Outbox SMT, and sends it to the “outbox.event.order” topic. Finally, our Delivery microservice receives the event and persists the data inside the TB_DELIVERY table!
Received a Kafka event | aggregateId: gWUdBbaVTK6nZlE9Oj67Gw==, EventType: OrderPlaced, payload: DeliveryEvent{orderId=201, customerId=30}

Hibernate: insert into tb_delivery (customer_id, order_id, id) values (?, ?, ?)

Received a Kafka event | aggregateId: qRYZU4CXRqO1AS6jL9b+Tg==, EventType: OrderPlaced, payload: DeliveryEvent{orderId=202, customerId=30}

Hibernate: insert into tb_delivery (customer_id, order_id, id) values (?, ?, ?)

Received a Kafka event | aggregateId: KWxkC3RFSaiERQfGnNRF4w==, EventType: OrderPlaced, payload: DeliveryEvent{orderId=203, customerId=30}

Hibernate: insert into tb_delivery (customer_id, order_id, id) values (?, ?, ?)
Note: The Order microservice is connecting to the Oracle database using the c##dbzuser user which is a CDB user. Sometimes, you aren’t allowed to use a CDB user for your applications. I have tested using different users for the Debezium connector and Order microservice and it worked. For example, Order connects to the database using a PDB user named “ORDER”. Inside our connector configuration, we point the connector to the Outbox table inside the order schema. This has worked for me without a problem but I didn’t test it enough to be sure. Let me know if this solution works for you!
database.user: C##DBZUSER
schema.include.list: ORDER
table.include.list: ORDER.OUTBOX
Conclusion
With Debezium, we can easily capture the database events and publish them to Kafka topics. The Outbox pattern is only one of the many use cases of the Debezium. Debezium can help you in many scenarios. For instance:
- You can use it for audit logging and capture all the changes that are being made by the users.
- You can update your Materialized Views that’s hold data from multiple source tables.
- You can use it to synchronize your cache with the data inside your database. If any row of your database tables gets updated, Debezium can capture the changes. Therefore, your cache service can consume those changes and update or invalidate the cache.
For accessing the codes and deployment files, visit my Github repository
In the next blog post, I’m going to create a Saga application with Kafka, Debezium, and Micronaut to manage distributed transactions and transaction compensation.
In the end, I highly recommend you to check these blog posts:
Hello,
Great post Sina.
I have a question about the outbox pattern, if we need to pool db in continue to prevent non transactional crach, maybe we can remove the messaging part and the consumer pool the db in continue ?
Best,
Hello. Thank you so much 🙂
If I understood your question correctly, in microservices architecture, microservices should have separate databases. I didn’t do it in this example since I had only 16GB of ram and could not run two separate databases. So Delivery microservice must not access the Order database. If both connect to one database and the database goes down, we will lose the functionality of two services instead of one.
And by using Kafka Connectors, our microservices don’t need to deal with different ways and technologies of sending and receiving messages. So microservices only provide their business functions and only work with Kafka instead of different technologies. This results in good separation of concerns.
Kind regards
Great post!
Thank you very much 🙂
Incredible write up! Is Oracle DB might be replaced with another DB, for instance with PostgreSQL?
Thank you very much 🙂
Sure. Debezium supports many databases (like PostgreSQL, MySQL, MongoDB, …) Check their documentation for more info.
[…] Reliable Messaging in Microservices – Implementing Outbox Pattern using Kafka, Debezium, Micronaut… by Sina Nourian […]
I have just finished reading this clearly written and thought-provoking post. Your article expresses all aspects of topic, with well-explained details about implementing/deploying.
As a suggestion, it would be better if it is possible, you offer some replacement/equivalent for tools/services (such as Debezium) which you use in your posts.
Thanks for such uplifting coverage!
Hello Abolfazl,
Thank you for your comment. much appreciated 🙂
Actually, there are some powerful CDC products but most of them are not free as far as I know.
And if you want to use it to implement the Outbox and/or Saga pattern, you have to customize it yourself and do more coding.
But there are some good open-source CDC projects for MySQL: Maxwell Daemon, SpinalTap, MySQL Streamer and MySQL Binlog Connector for Java
And for PostgreSQL: wal2json and Cainophile
Also, there are some other projects specifically for implementing Saga Pattern.
For example, if you are using Java you can use Axon, Eventuate or SimpleSourcing. And for Golang, there are two github projects: itimofeev/go-saga and lysu/go-saga.
I think Debezium is by far the best open-source technology that can be used for implementing CDC, reliable messaging, aggregation views and etc. Also, it’s (almost) language-independent thanks to Kafka since most popular languages now have a Kafka client library and it can even be used as a standalone server if you don’t want to use Kafka!
From the Debezium doc:
Debezium provides a ready-to-use application that streams change events from a source database to messaging infrastructure like Amazon Kinesis, Google Cloud Pub/Sub, Apache Pulsar or Redis (Stream). For streaming change events to Apache Kafka, it is recommended to deploy the Debezium connectors via Kafka Connect.I appreciate for the time you spent on offering similar tools for Debezium and explaining why you choose it. I’ll definitely stick around for future posts 😉
It’s very kind of you 🙂 Thanks!
Hey, I want to know. So we need to have “outbox” table on each microservice?