In the previous post, we have learnt about Strimzi and deployed a Kafka Cluster on Minikube and also tested our cluster. Now, let’s build a Producer application with Go and a Consumer application with Scala language, deploy them on Kubernetes and see how it all works.
This is the Part 2 of the Apache Kafka on Kubernetes with Strimzi blog post. In case you haven’t read the previous post, I recommend you to check it out:
- Part 1: Creating and Deploying a Strimzi Kafka Cluster on Kubernetes
- Part 2: Creating Producer and Consumer using Go and Scala and deploying on Kubernetes
- Part 3: Monitoring our Strimzi Kafka Cluster with Prometheus and Grafana
The Producer
For creating the producer, I would like to use the Go language. We’re going to add below dependencies to our module file:
github.com/segmentio/kafka-go // Kafka
go.uber.org/zap // Logging
google.golang.org/protobuf // Message Serialization
github.com/urfave/cli/v2 // CLI
With the help of urfave cli library, we can easily add some arguments (cli and environment variables) to our application. The variables we need are:
- Kafka Bootstrap servers
- Topic name
- Buffer size (for batching messages)
- Sleep time between producing messages
Check out the code on my Github to see how I leveraged this library to easily add and use these arguments.
Let’s create kafka.go file with two methods in it. One for creating a producer and one for creating a consumer (Although we are going to only use the producer, but I wanted to show you how to create a consumer too).
package kafka

import (
	"github.com/segmentio/kafka-go"
	log "strimzi-producer/internal/platform/logger"
)

func Consumer(servers []string, groupId string, topic string) *kafka.Reader {
	return kafka.NewReader(kafka.ReaderConfig{
		Brokers:  servers, //[]string{"localhost:9092"},
		GroupID:  groupId,
		Topic:    topic,
		MinBytes: 10e3, // 10KB
		MaxBytes: 10e6, // 10MB
		Logger:      kafka.LoggerFunc(log.Logger.Infof),
		ErrorLogger: kafka.LoggerFunc(log.Logger.Errorf),
	})
}

func Producer(servers []string, topic string) *kafka.Writer {
	return &kafka.Writer{
		Addr:         kafka.TCP(servers...),
		Topic:        topic,
		RequiredAcks: kafka.RequireOne,
		Logger:      kafka.LoggerFunc(log.Logger.Infof),
		ErrorLogger: kafka.LoggerFunc(log.Logger.Errorf),
	}
}
Now, let’s create a very simple message schema using Protobuf and generate Go output using protoc:
syntax = "proto3";

package producer;

option go_package = "producer";

message MyMessage {
  int32 id = 1;
  string message = 2;
}
And here’s the code that creates and produces messages to Kafka:
package producer

import (
	"context"
	"fmt"
	"github.com/segmentio/kafka-go"
	"google.golang.org/protobuf/proto"
	"math/rand"
	"strconv"
	log "strimzi-producer/internal/platform/logger"
	"time"
)

type client struct {
	sleepTime time.Duration
	bufferSize uint
	writer    *kafka.Writer
}

func NewProducerClient(sleepTime time.Duration, bufferSize uint, writer *kafka.Writer) *client {
	return &client{
		sleepTime: sleepTime,
		bufferSize: bufferSize,
		writer:    writer,
	}
}

func (c *client) Produce() {
	log.Logger.Info("Starting the Producer...")
	for {
		buffer := make([]kafka.Message, c.bufferSize)
		var j uint
		for j = 0; j < c.bufferSize; j++ {
			id := strconv.Itoa(rand.Int())
			msg := MyMessage{
				Id:      id,
				Message: fmt.Sprintf("Just a message with a random number: %d", rand.Int()),
			}
			bytes, err := proto.Marshal(&msg)
			if err != nil {
				log.Logger.Errorf("Error in marshaling the message: %s", err.Error())
				return
			}
			buffer[j] = kafka.Message{
				Key:   []byte(id),
				Value: bytes,
			}
		}
		err := c.writer.WriteMessages(context.Background(), buffer...)
		log.Logger.Debugf("Sent %d messages to the topic", len(buffer))
		if err != nil {
			log.Logger.Errorf("Error in producing message to Kafka: %s", err.Error())
			return
		}
		time.Sleep(c.sleepTime)
	}
}
In the code above, we are putting serialized messages inside a buffer slice and produce them to Kafka as a batch.
There are some other (not complicated) parts in this project (health check api, graceful shutdown, …). Since they’re out of the scope of this article and also to keep this post shorter, I don’t explain them here. Please visit the project on my Github for full code and feel free to contact me or leave a comment if you have any question or suggestion on any part of the code.
Now, In order to deploy our Producer to the Kubernetes, we need to create a Dockerfile:
FROM golang:1.15-alpine
LABEL maintainer="Sina Nourian <sina.nourian@gmail.com>"
WORKDIR /app
COPY . .
RUN go mod download
RUN go build -o producer ./cmd/producer
CMD ["./producer"]
Let’s build our Dockerfile and publish it to our local repository:
$ docker build -t nrsina/strimzi-producer:v1 .
And also a Kubernetes Deployment file to deploy the Producer on Kubernetes:
apiVersion: apps/v1
kind: Deployment
metadata:
  name: strimzi-producer-deployment
spec:
  replicas: 1
  selector:
    matchLabels:
      app: strimzi-producer
  template:
    metadata:
      labels:
        app: strimzi-producer
    spec:
      containers:
      - name: strimzi-producer
        image: nrsina/strimzi-producer:v1
        imagePullPolicy: Never
        ports:
        - name: http
          containerPort: 8080
          protocol: TCP
        livenessProbe:
          httpGet:
            path: /health
            port: http
            scheme: HTTP
          initialDelaySeconds: 3
          timeoutSeconds: 1
          periodSeconds: 15
        readinessProbe:
          httpGet:
            path: /health
            port: http
            scheme: HTTP
          initialDelaySeconds: 3
          timeoutSeconds: 1
          periodSeconds: 15
        env:
        - name: SP_SERVE_ADDR
          value: ":8080"
        - name: SP_BOOTSTRAP_SERVERS
          value: "my-cluster-kafka-bootstrap.kafka:9092"
        - name: SP_KAFKA_TOPIC
          value: "my-topic"
        - name: SP_SLEEP_TIME_MS
          value: "2000ms"
        - name: SP_BUFFER_SIZE
          value: "5"
Let’s apply our deployment file, wait for the pod to start and get the logs from the pod:
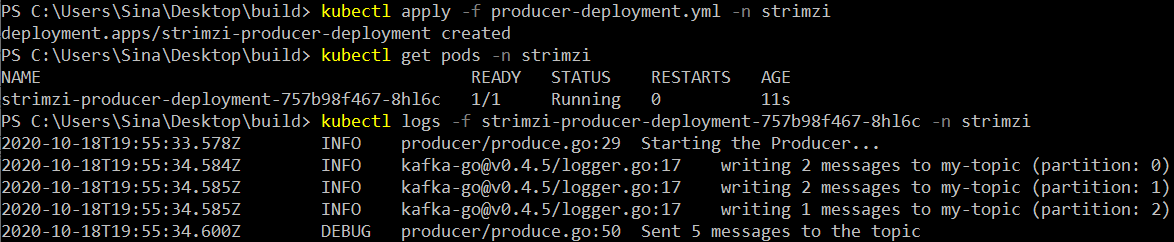
As you can see from the above screenshot, our producer is up and running. Awesome! Now, let’s get our hands dirty with the Consumer…
The Consumer
For our consumer, we’re going to build a consumer using the Scala language with Alpakka Kafka library which is an impressive Kafka library by Lightbend. By scaling our consumer, we can see how Consumer Group works. But before jumping into the code, I’d like to talk a little bit about Delivery Semantics (Delivery Guarantees) since it’s a very important issue to consider when using any stream processing framework.
Delivery Semantics
Kafka uses a dumb broker / smart consumer design. The broker only keeps the messages for a certain amount of time and consumers should keep track of their offset in partitions of the topic. So the developer should configure the consumer based on the business needs. We have three delivery semantics:
- At most once. This is the most relaxed semantic. With this semantic, message might get processed one time or not at all (message can get lost and it cannot be redelivered). This semantic happens when the commitment of the offsets has nothing to to with the processing of the message.
By setting the enable.auto.commit property of the consumer to true, the consumer offsets will be periodically committed in the background. So we have no control on the offsets and if the process of a message fails, the consumer can’t request the message from the topic again since the offset has been committed before and moved passed the failed message. - At least once. This semantic ensures that a message may never get lost but may get redelivered. So the message might get processed more than one time (but never lost). When this delivery semantic is needed, the consumer has to take control of the offset committing.
The commitment should happen after the processing of the message is done. So if the process fails, no offset will be committed. And on the next pull from the topic, the failed message will get redelivered again.
Bear in mind that with this approach, the processing of a message may be successful but the committing fails for any reason. So then again the message will be redelivered. This is because our processing (for example, persisting in a database) and committing the offsets in Kafka are not in a single transaction. (The enable.auto.commit property should be false since we need to take control of the offset committing). - Exactly once. This semantic guarantees that the processing of the message happens only once. This is the most strong semantic. When we want to have exactly once semantics, the process and committing of the message should happen in a single transaction.
For example, if we are persisting the message in PostgreSQL, we should also persist the offsets in the same database so we can easily wrap both of them in a single transaction. If the persisting of the offset fails, the persisting of the message will also roll backs and vice versa.
You may ask why not always use exactly once semantics? Sounds like it’s the best approach! That may be true but you have to take the overhead it causes into the consideration. So use the semantic that best meets your business requirements.
Creating the Consumer
We are using Akka for this project. Akka is a toolkit consisting of many open-source libraries for designing concurrent, distributed and resilient applications by leveraging Actor Model. Akka uses Actor model which provides a high level of abstraction for building concurrent applications and alleviates the developer from dealing with low-level thread management and locking. Actors are single and independent units that encapsulate state and behavior and they communicate with other actors via message passing. A hierarchy of actors can be formed in Akka. Refer to Akka’s documentation for more information.
Our configuration resides in application.conf file [HOCON format]:
akka {
  loglevel = DEBUG
}

akka.management {
  http {
    hostname = "127.0.0.1"
    hostname = ${?AKKA_MANAGEMENT_HTTP_HOST}
    bind-hostname = "0.0.0.0"
    port = 8558
    port = ${?AKKA_MANAGEMENT_HTTP_PORT}
  }
}

strimzi-consumer {
  bootstrap-servers = "localhost:9092"
  bootstrap-servers = ${?SC_BOOTSTRAP_SERVER}
  group-id = "my-group"
  group-id = ${?SC_GROUP_ID}
  enable-auto-commit = "false" // false for at-least-once semantics
  enable-auto-commit = ${?SC_AUTO_COMMIT}
  auto-offset-reset = "latest" // other value: earliest
  auto-offset-reset = ${?SC_OFFSET_RESET}
  topic = "my-topic"
  topic = ${?SC_TOPIC_NAME}
  parallelism = 10 // batch processing of consumed messages
  parallelism = ${?SC_PARALLELISM_NUM}
  sleep-time-ms = 100 // simulates computation of a message
  sleep-time-ms = ${?SC_SLEEP_TIME}
}
Since we have added the Akka Management dependency, we need to configure it via akka.management key. Akka Management provides some useful HTTP APIs for easy management. We only need the health check APIs provided by the Akka Management because we’re going to deploy it on Kubernetes.
The important part of the configuration is the strimzi-consumer key. Here, we have added the configurations needed for a Kafka consumer. notice the ${?…} value for each key. What happens here is that if the environment variable with the specified name exists (for example, SC_BOOTSTRAP_SERVER), the value from environment variable will be overridden. the ? before variable name makes it optional.
Before creating our actors, an ActorSystem must be defined with a root actor (Guardian). For the sake of simplicity, we have directly used our Consumer Actor instead of a Guardian. So, in our Main class (Application.scala):
object Application extends App {
  ActorSystem[Nothing](ConsumerClient(), "StrimziConsumer")
}
We need to create a ConsumerSettings object to pass to the Consumer. we have created our ConsumerSettings object in ConsumerProperties.scala file:
def toConsumerSettings: ConsumerSettings[String, Array[Byte]] = {
  ConsumerSettings(system, new StringDeserializer, new ByteArrayDeserializer)
    .withBootstrapServers(bootstrapServers)
    .withGroupId(groupId)
    .withProperty(ConsumerConfig.AUTO_OFFSET_RESET_CONFIG, autoOffsetReset)
    .withProperty(ConsumerConfig.ENABLE_AUTO_COMMIT_CONFIG, enableAutoCommit)
    .withStopTimeout(2.seconds)
}
As you have noticed, we have directly used a Byte Array as the value type of the Kafka message. It’s considered a best practice in Alpakka Kafka library:
The general recommendation for de-/serialization of messages is to use byte arrays (or Strings) as value and do the de-/serialization in a
Akka documentationmapoperation in the Akka Stream instead of implementing it directly in Kafka de-/serializers. When deserialization is handled explicitly within the Akka Stream, it is easier to implement the desired error handling strategy as the examples below show.
Now, let’s create our Consumer actor:
package com.snourian.strimzi.consumer

import akka.actor.ActorSystem
import akka.actor.typed.Behavior
import akka.actor.typed.scaladsl.Behaviors
import akka.actor.typed.scaladsl.adapter.TypedActorSystemOps
import akka.kafka.scaladsl.{Committer, Consumer}
import akka.kafka.{CommitterSettings, Subscriptions}
import akka.management.scaladsl.AkkaManagement
import com.snourian.strimzi.producer.consumer.MyMessage

import scala.concurrent.{ExecutionContextExecutor, Future}
import scala.util.Try

object ConsumerClient {

  sealed trait Command

  private final case class KafkaConsumerStopped(reason: Try[Any]) extends Command

  def apply(): Behavior[Nothing] = {
    Behaviors.setup[Command] { ctx =>
      ctx.log.debug("Initializing ConsumerClient actor...")
      // Alpakka Kafka still uses the old ActorSystem (Classic System) which is untyped,
      // we need to convert the typed actor system to the classic untyped system.
      implicit val system: ActorSystem = ctx.system.toClassic
      implicit val ec: ExecutionContextExecutor = ctx.executionContext

      AkkaManagement(system).start()
      val consumerProps = ConsumerProperties(system)
      val subscription = Subscriptions.topics(consumerProps.topic)
      /*
      committableSource => offset can be committed after the computation -> at-least-once delivery semantic
      sourceWithOffsetContext => same as committableSource, but with offset position as flow context
      for at-most-once, use atMostOnceSource() and for exactly-once, use plainSource() for a fine-grained control over offset committing
      use Consumer.DrainingControl if you want to stop the stream after some amount of time
       */
      val consume = Consumer.sourceWithOffsetContext(consumerProps.toConsumerSettings, subscription)
        .mapAsync(consumerProps.parallelism) { record => // mapAsync -> process received messages in parallel (batch)
          Future {
            system.log.info(s"consumed record with Id ${record.key()} from partition ${record.partition()}")
            MyMessage.parseFrom(record.value()) // compile with SBT to create MyMessage class inside target folder
            Thread.sleep(consumerProps.sleepTime) // some heavy computation!
          }
        }.runWith(Committer.sinkWithOffsetContext(CommitterSettings(system)))
      // send a message to self if the consumer stops
      consume.onComplete { result =>
        ctx.self ! KafkaConsumerStopped(result)
      }
      Behaviors.receiveMessage[Command] {
        case KafkaConsumerStopped(reason) => //stop the Behavior when the consumer stops
          ctx.log.warn("Consumer stopped {}", reason)
          Behaviors.stopped
      }
    }.narrow //we don't care about the type, so narrow it down to Nothing (instead of Command)
  }
}
Alpakka Kafka provides various consumer implementations for different needs. I explained some of them in the comments above the Consumer code. here, we are using sourceWithOffsetContext that can be used to achieve at least once delivery semantics. also, with the help of the MapAsync, we are processing messages in batch and committing the offset after the processing of the message.
We’re almost done! Now we need to create a Docker image and publish it into our repository. Since we are using SBT build tool, we can use the SBT Native Packager plugin that can get this job done automatically. So no need to create a Dockerfile by hand.
For the SBT Native Packager to work, first we need to add the SBT plugin into the /project/plugins.sbt file
addSbtPlugin("com.typesafe.sbt" % "sbt-native-packager" % "1.7.6")And then we need to enable the plugin by adding enablePlugins(JavaAppPackaging) in the build.sbt file. we can also customize the process with the settings provided by the plugin. For example, the default base image that this plugin uses is large and we can easily provide our desired base image:
lazy val dockerSettings = Seq(
  dockerBaseImage := "openjdk:11-jre-slim",
  packageName in Docker := "strimzi-consumer",
  maintainer in Docker := "Sina Nourian <sina.nourian@gmail.com>",
  version in Docker := "v1",
  dockerUsername := Some("nrsina")
)
Now, by using the below command, this plugin creates a Docker image and publish it to our local repository. Also, the Dockerfile will be created at /target/docker folder. Check out the project on my Github for more information
$ sbt docker:publishLocal
If you only want the SBT plugin to create the Dockerfile and not to publish it, run the below command:
$ sbt docker:stage
Now it’s time to write some YAML files:
apiVersion: apps/v1
kind: Deployment
metadata:
  name: strimzi-consumer-deployment
  labels:
    app: strimzi-consumer
spec:
  replicas: 3
  selector:
    matchLabels:
      app: strimzi-consumer
  template:
    metadata:
      labels:
        app: strimzi-consumer
    spec:
      containers:
      - name: strimzi-consumer
        image: nrsina/strimzi-consumer:v1
        imagePullPolicy: Never # IfNotPresent
        ports:
        - name: management
          containerPort: 8558
          protocol: TCP
        readinessProbe:
          httpGet:
            path: /ready
            port: management
          periodSeconds: 10
          failureThreshold: 3
          initialDelaySeconds: 10
        livenessProbe:
          httpGet:
            path: /alive
            port: management
          periodSeconds: 10
          failureThreshold: 5
          initialDelaySeconds: 20
        env:
        - name: SC_BOOTSTRAP_SERVER
          value: "my-cluster-kafka-bootstrap.kafka:9092"
        - name: SC_GROUP_ID
          value: "my-group"
        - name: SC_TOPIC_NAME
          value: "my-topic"
        - name: SC_PARALLELISM_NUM
          value: "5"
        - name: SC_SLEEP_TIME
          value: "200"
We are going to create 3 replicas for our consumer to see how the GroupId works.
Now, just like before, let’s apply our deployment file, wait for the pod to start and get logs from one of the pods:
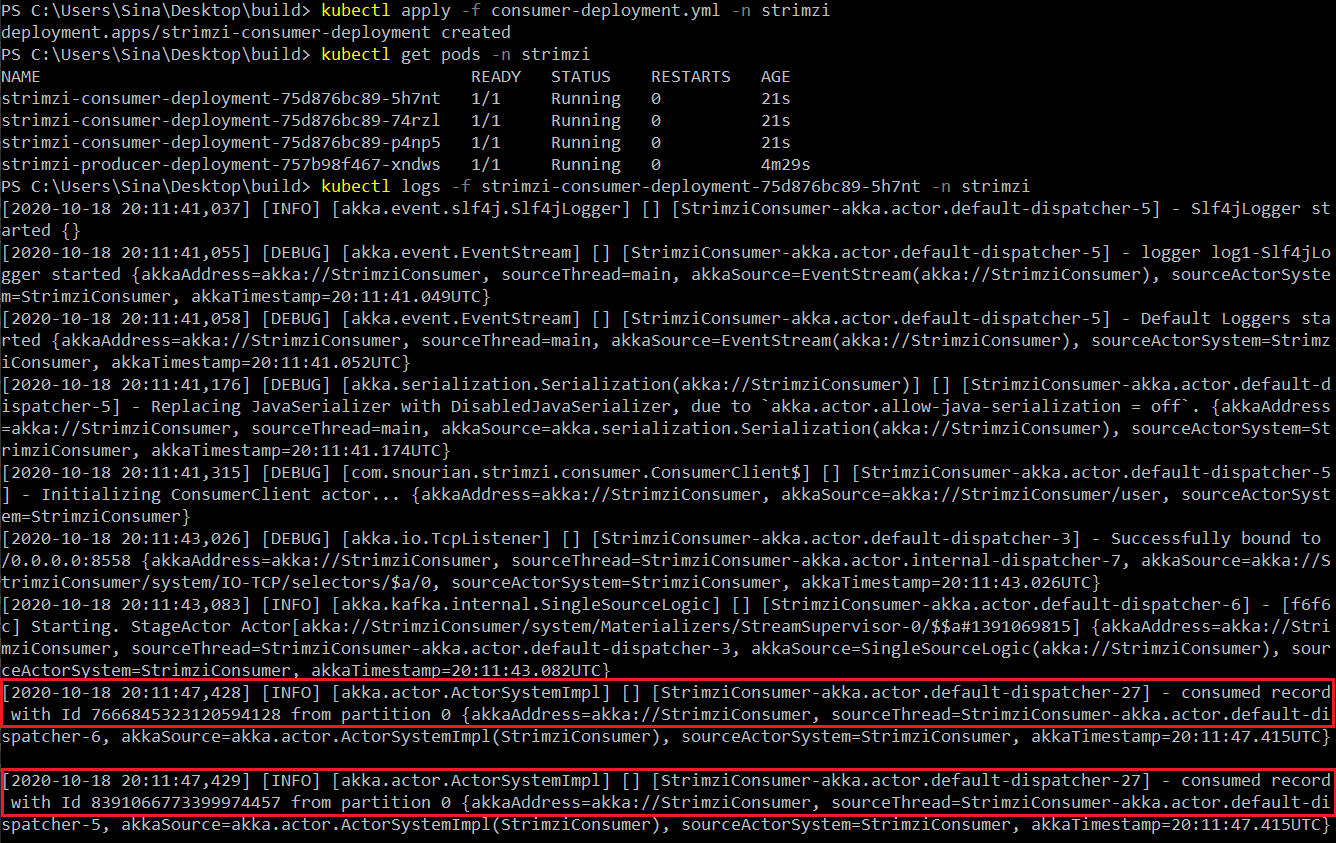
Voilà! Three replicas of our consumer app is running and consuming messages from Kafka.
Conclusion
After deploying our Kafka Cluster on Kubernetes (Part 1), we have built a producer app in Go language and a consumer app in Scala language. After publishing our applications and watching the logs, it looks like everything is fine and running well. But is it? Are we sure that everything is ok? What is the rate of producing / consuming messages? Do we have a “Consumer Lag” here? By the look of the logs everything is fine and running well. But we are not really sure how our apps and Kafka are performing. We need some monitoring tools to monitor the Kafka’s performance. In the next part of the series, we are going to use Prometheus and Grafana to monitor our Cluster.
Feel free to ask any questions or share any comments in the comment section or contact me via email.
[…] architecture. But how can we implement a reliable message exchange between our microservices? What delivery semantics should we […]